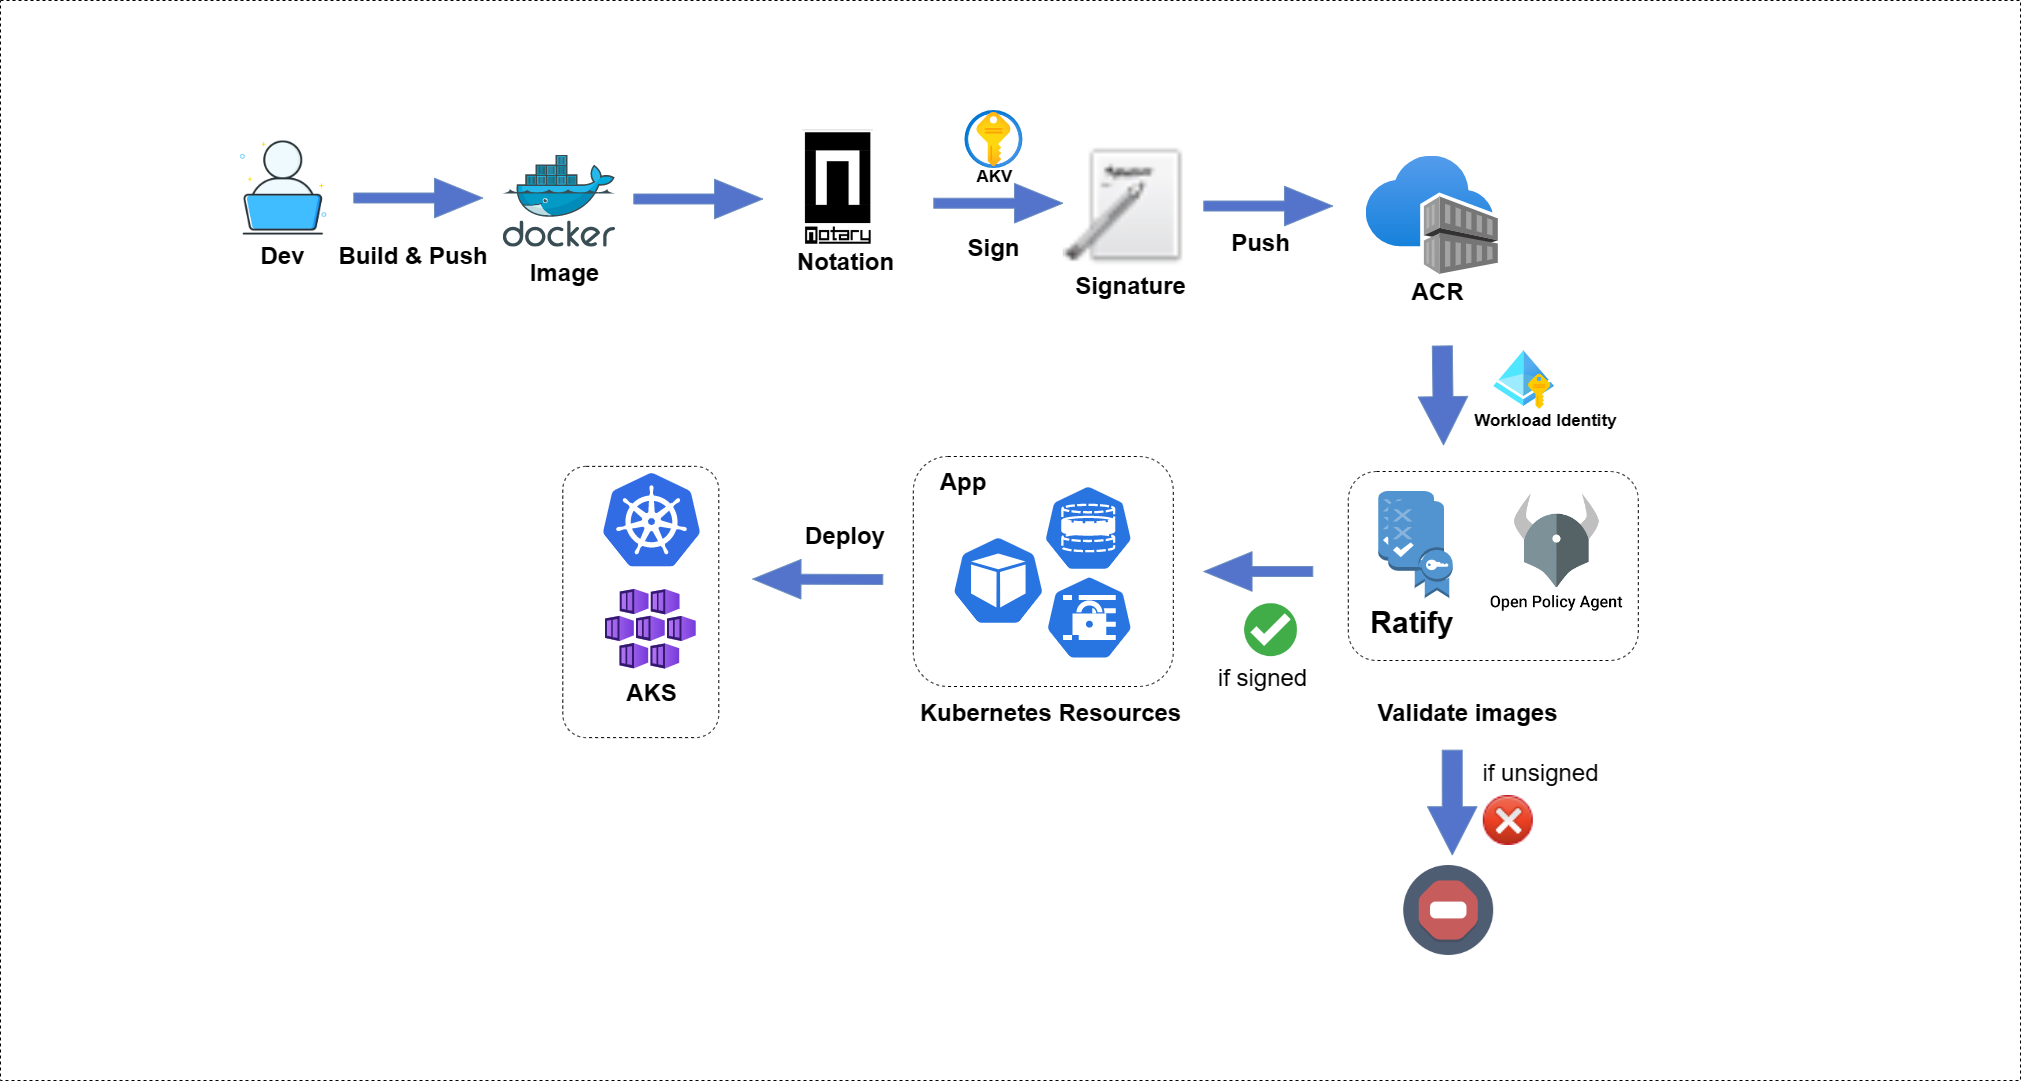
Ratify on Azure: Allow only signed images to be deployed on AKS with Notation and Ratify
The signed container images enable users to assure deployments are built from a trusted entity and verify images haven't been tampered with since their creation. The signed image ensures integrity and authenticity before the user pulls an image into any environment and avoid attacks.
Azure Key Vault (AKV) stores a signing key, Notation and the Notation AKV plugin (azure-kv) consumes this key to sign and verify container images and other artifacts. Azure Container Registry (ACR) allows you to store and distribute signed images with signatures.
This article walks you through an end-to-end workflow of validating and enforcing only signed images are allowed to be deployed on AKS with Notation and Ratify.
In this article:
- Create an AKS cluster with Azure Workload Identity configured
- Install Ratify and OPA Gatekeeper
- Deploy two sample images on AKS
- Validate the signature associated with the sample image using Ratify and Gatekeeper
Prerequisite
Complete the steps in Build, sign, and verify container images using Notation and Azure Key Vault (Preview). Please note you need to have a signed image and configure the environment variables before getting started with the following steps.
Create and configure Azure Workload Identity
Ratify pulls artifacts from a private Azure Container Registry using Workload Federated Identity in an Azure Kubernetes Service cluster. For an overview on how workload identity operates in Azure, refer to the documentation. You can use workload identity federation to configure an Azure AD app registration or user-assigned managed identity. The following workflow includes the Workload Identity configuration.
Configure environment variables.
export IDENTITY_NAME=<Identity Name>
export GROUP_NAME=<Azure Resource Group Name>
export SUBSCRIPTION_ID=<Azure Subscription ID>
export TENANT_ID=<Azure Tenant ID>
export AKS_NAME=<Azure Kubernetes Service Name>
export RATIFY_NAMESPACE=<Namespace where Ratify deployed, defaults to "gatekeeper-system">
Create a Workload Federated Identity.
az identity create --name "${IDENTITY_NAME}" --resource-group "${GROUP_NAME}" --location "${LOCATION}" --subscription "${SUBSCRIPTION_ID}"

export IDENTITY_OBJECT_ID="$(az identity show --name "${IDENTITY_NAME}" --resource-group "${GROUP_NAME}" --query 'principalId' -otsv)"
export IDENTITY_CLIENT_ID=$(az identity show --name ${IDENTITY_NAME} --resource-group ${GROUP_NAME} --query 'clientId' -o tsv)
Note: If you have identity authentication issues on your local machine, you can use Azure Cloud Shell to complete this section.
Configure workload identity for ACR
Configure user-assigned managed identity and enable AcrPull role to the workload identity.
```bash
az role assignment create \
--assignee-object-id ${IDENTITY_OBJECT_ID} \
--role acrpull \
--scope subscriptions/${SUBSCRIPTION_ID}/resourceGroups/${GROUP_NAME}/providers/Microsoft.ContainerRegistry/registries/${ACR_NAME}
```
Create an OIDC enabled AKS cluster and configure workload identity
Create an OIDC enabled AKS cluster by following the steps below. You can skip this step if you have an AKS cluster with OIDC enabled.
# Install the aks-preview extension
az extension add --name aks-preview

# Register the 'EnableWorkloadIdentityPreview' feature flag
az feature register --namespace "Microsoft.ContainerService" --name "EnableWorkloadIdentityPreview"
az provider register --namespace Microsoft.ContainerService

az aks create \
    --resource-group "${GROUP_NAME}" \
    --name "${AKS_NAME}" \
    --node-vm-size Standard_DS3_v2 \
    --node-count 1 \
    --generate-ssh-keys \
    --enable-workload-identity \
    --attach-acr ${ACR_NAME} \
    --enable-oidc-issuer

# Connect to the AKS cluster:
az aks get-credentials --resource-group ${GROUP_NAME} --name ${AKS_NAME}

export AKS_OIDC_ISSUER="$(az aks show -n ${AKS_NAME} -g ${GROUP_NAME} --query "oidcIssuerProfile.issuerUrl" -otsv)"
Note: The official steps for setting up Workload Identity on AKS can be found here.
This step above may take around 10 minutes to complete. The registration status can be checked by running the following command:
az feature show --namespace "Microsoft.ContainerService" --name "EnableWorkloadIdentityPreview" -o table
Name                                                      RegistrationState
--------------------------------------------------------    -------------------
Microsoft.ContainerService/EnableWorkloadIdentityPreview    Registered
Establish federated identity credential. On AZ CLI
${RATIFY_NAMESPACE}is where you deploy Ratify:az identity federated-credential create \
--name ratify-federated-credential \
--identity-name "${IDENTITY_NAME}" \
--resource-group "${GROUP_NAME}" \
--issuer "${AKS_OIDC_ISSUER}" \
--subject system:serviceaccount:"${RATIFY_NAMESPACE}":"ratify-admin"
Configure access policy for AKV
Set the environmental variable for Azure Key Vault URI.
export VAULT_URI=$(az keyvault show --name ${AKV_NAME} --resource-group ${GROUP_NAME} --query "properties.vaultUri" -otsv)Ratify requires secret permissions to retrieve the public certificates for the entire certificate chain, please set private keys to Non-exportable at certificate creation time to avoid security risk. Learn more about non-exportable keys here
Note: If you were unable to configure certificate policy, please consider specifying the public root certificate value inline using the inline certificate provider to reduce risk of exposing private key.
Configure policy for user-assigned managed identity:
```bash
az keyvault set-policy --name ${AKV_NAME} \
--secret-permissions get \
--object-id ${IDENTITY_OBJECT_ID}
```
Deploy Gatekeeper and Ratify on AKS
run az aks show -g "${GROUP_NAME}" -n "${AKS_NAME}" --query addonProfiles.azurepolicy to verify if the AKS cluster has azure policy addon enabled, learn more at use azure policy
When Azure Policy Addon is not enabled
Deploy Gatekeeper from helm chart:
helm repo add gatekeeper https://open-policy-agent.github.io/gatekeeper/charts

helm install gatekeeper/gatekeeper  \
--name-template=gatekeeper \
--namespace gatekeeper-system --create-namespace \
--set enableExternalData=true \
--set validatingWebhookTimeoutSeconds=5 \
--set mutatingWebhookTimeoutSeconds=2
Install Ratify on AKS from helm chart:
# Add a Helm repo
helm repo add ratify https://notaryproject.github.io/ratify

# Install Ratify
helm install ratify \
    ./charts/ratify --atomic \
    --namespace ${RATIFY_NAMESPACE} --create-namespace \
    --set featureFlags.RATIFY_CERT_ROTATION=true \
    --set akvCertConfig.enabled=true \
    --set akvCertConfig.vaultURI=${VAULT_URI} \
    --set akvCertConfig.cert1Name=${KEY_NAME} \
    --set akvCertConfig.tenantId=${TENANT_ID} \
    --set oras.authProviders.azureWorkloadIdentityEnabled=true \
    --set azureWorkloadIdentity.clientId=${IDENTITY_CLIENT_ID}
Enforce Gatekeeper policy to allow only signed images can be deployed on AKS:
kubectl apply -f https://notaryproject.github.io/ratify/library/default/template.yaml
kubectl apply -f https://notaryproject.github.io/ratify/library/default/samples/constraint.yaml
When Azure Policy Addon is enabled on AKS
Ensure your AKS cluster is 1.26+
az feature register -n AKS-AzurePolicyExternalData --namespace Microsoft.ContainerServiceInstall Ratify on AKS from helm chart:
# Add a Helm repo
helm repo add ratify https://notaryproject.github.io/ratify
helm repo update

# Install Ratify
helm install ratify \
    ./charts/ratify --atomic \
    --namespace gatekeeper-system --create-namespace \
    --set provider.enableMutation=false \
    --set featureFlags.RATIFY_CERT_ROTATION=true \
    --set akvCertConfig.enabled=true \
    --set akvCertConfig.vaultURI=${VAULT_URI} \
    --set akvCertConfig.cert1Name=${KEY_NAME} \
    --set akvCertConfig.tenantId=${TENANT_ID} \
    --set oras.authProviders.azureWorkloadIdentityEnabled=true \
    --set azureWorkloadIdentity.clientId=${IDENTITY_CLIENT_ID}
Create and assign azure policy on your cluster:
custom_policy=$(curl -L https://raw.githubusercontent.com/deislabs/ratify/main/library/default/customazurepolicy.json)
definition_name="ratify-default-custom-policy"
scope=$(az aks show -g "${GROUP_NAME}" -n "${AKS_NAME}" --query id -o tsv)

definition_id=$(az policy definition create --name "${definition_name}" --rules "$(echo "${custom_policy}" | jq .policyRule)" --params "$(echo "${custom_policy}" | jq .parameters)" --mode "Microsoft.Kubernetes.Data" --query id -o tsv)

assignment_id=$(az policy assignment create --policy "${definition_id}" --name "${definition_name}" --scope "${scope}" --query id -o tsv)

echo "Please wait policy assignmet with id ${assignment_id} taking effect"
echo "It often requires 15 min"
echo "You can run 'kubectl get constraintTemplate ratifyverification' to verify the policy takes effect"
Deploy two sample image to AKS cluster
Run a Pod using an image that you have signed in the previous step. Ratify will verify if this image has a valid signature.
$ kubectl run ratify-demo-signed --image=$IMAGE
Pod ratify-demo-signed created
Deploy an unsigned image to AKS cluster. The deployment has been denied since the image has not been signed and doesn't meet the deployment criteria.
$ kubectl run ratify-demo-unsigned --image=unsigned:v1
Error from server (Forbidden): admission webhook "validation.gatekeeper.sh" denied the request: [ratify-constraint] Subject failed verification: wabbitnetworks.azurecr.io/test/net-monitor:unsigned

